Happy Christmas Rebecca!
Happy Christmas Rebecca! If you’re reading this, then I guess you’ve opened your Christmas present by now...
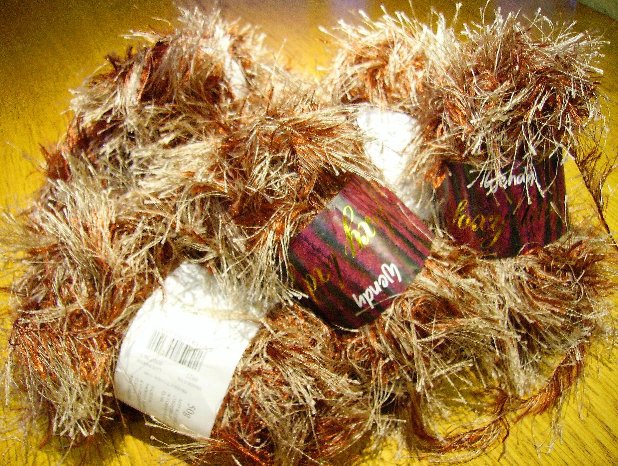
Some months ago, your mum said you wanted to knit the gilet from ‘Simply Knitting’ magazine, but that it was quite expensive. I think that I have now managed to find a suitable substitute yarn, so in your parcel you should have found 8 balls of Wendy Foxy Lady – which is virtually identical to the original Sirdar Foxy - it has the same length of yarn (40 metres) to 50g, and also the same recommended tension of 12.5 stitches and 17 rows to 10cms on size 7mm needles. Holly and Emily helped me to choose the colour, and we hope that you will like it too.
At the same time, having looked at the original magazine pattern, I thought there might be a few problems in knitting it, so I thought about making a simpler pattern for you. I also thought it might be fun for you to think about the business of designing and working out your own patterns a bit, so here it is...
Before you start knitting, make sure you read all this several times. There are some general / technical bits and pieces first, before we get to the exciting stuff – please don't skip them, because I hope they will help you to understand what we are doing:
1) Furry and eyelash type yarns have a 'grain' - one way up they run smoothly through your fingers and the hairs smooth down against the inner 'core', and if you run them through your fingers the other way up, they fluff up instead. I find that the knitting is slightly easier if I work with them in the 'fluffed up' direction, and not quite so many hairs get caught up in the knitting. Test which end of the ball gives this effect, and THEN MAKE SURE that you use the same end for every ball that you use, this makes sure that your work looks the same throughout.
2) Please do a tension swatch, this is really important if you are going to have a go at designing your own patterns (and yes, I do know that they are boring - Tough! just do it, OK?) Also note that it's often best to measure length of the swatch with this type of yarn, when it's hanging from the needle, rather than flat.
3) Use a reasonably firm cast on, either the long-tail one, or the cable cast on, this helps to prevent the cast on edge from flaring out widthways. Firm is not the same as tight (at least, not in this context), so you may like to use a larger size needle for casting on. On the other hand, make sure that you cast off nice and loosely, and if necessary use a larger needle for this bit too. Slipping the first stitch of every row is also a good idea; it gives a really neat chain edge, which you may find easier when you come to pick up stitches for the edgings later on.
4) Joining in new yarns is often easier with this stuff. The best way to do it is to pull out the hairs from the last couple of inches of the 2 ends to be joined, then tie the core threads from the two ends neatly together with a reef knot (that’s right over left, and left over right), and trim the ends so that they're hidden amongst the 'fur'.
5) All fancy yarns seem to look better from the purl side of the work; for some odd reason the knots or hairs or tassels tend to fall through more naturally to that side of the work (don't know why, it's a mystery), so for this pattern the purl side of the work is going to be treated as the right side. Make sure that you use the same side of the work for all 3 pieces - the easiest way will be if you use a safety pin or something similar to mark it, the side that you pin it to is the 'right side'
6) Stocking stitch has a nasty tendency to curl at the edges (inwards towards the purl side at the side edges, and upwards/downwards towards the knit side at the cast on/cast off ones), which is why you need to use some sort of edging. Garter stitch (every row knit), reverse garter stitch (every row purl), moss stitch and ribbing are all good for this, but ribbing/moss stitch are not easy to do on this type of yarn, so I've stuck to garter stitch for edgings. You can also use a couple of rows of double crochet (UK; US equivalent is single crochet) for edgings if you prefer, and this might be nice if you want to use a plain contrasting yarn for a 'boho' look...
7) Picking up stitches for edges - for horizontal edges like the back of the neck, pick up one stitch for every cast of one. For diagonal edges (like the shaping at the front of the neck), it's one stitch for every row involved. For stocking stitch vertical edges, use (as near as you can get it) the same ratio as you get for stitches to rows - in this example, if you get 12.5 stitches to 17 rows, that's about 2 stitches picked up for every 3 rows - have I mentioned before that there's lots of maths involved in knitting (great, isn't it ;) For vertical edges in garter stitch, pick up 1 stitch for every 2 rows (that's 1 'ridge')
8) Sewing up. You can use some of your yarn for this, but it can make quite bulky seams. It will probably be better to use a matching sewing thread, and on this occasion, oversew the edges together, only picking up the threads in the chain edge, rather than mattress stitching. It's possible in this kind of yarn for the seam to almost disappear if you're careful, but if you do find that a lot of hairs get trapped in the seam, use a blunt needle to carefully ease them out. For pinning everything together for sewing up purposes, safety pins are good.
9) Estimating yarn quantities needed - always a dodgy one, this ... Have a look at my how-to on the subject for this. I'm keeping this pretty simple, so I'm going to ask you to measure off some lengths of yarn for the edgings before you start work, and put these aside while you knit the back and fronts, that way you can concentrate on just knitting the 3 parts you need, and know that you will have enough left over for the edging.
10) I've assumed a 32 - 34 inch bust (ie UK size 8 - 10) for this pattern, but the finished work will measure 36 inches all round, and that's fine - furry yarn comes up thickly, so you need a bit of 'ease' around the body. Also you may want to wear it over a jumper, so this should allow you to do that too. I'm also allowing up to 20 inches for length. If you should want to do it in a different size, or later you want to do it in a different yarn, you will be able to do this by taking your desired width and length measurements in inches and multiplying these by the number of stitches and rows to that you get to 1 inch - in this yarn for example, you should get 3.125 stitches and 4.25 rows to the inch, so supposing you want to knit a cushion cover 12 inches by 12 inches, you would multiply 3.125 stitches by 12 to give you a cast on of 38 stitches (actually 37.5 stitches, but obviously you need to round up any fractions!), and work in stocking stitch for 4.25 rows times 12 (that's 51 rows altogether). If you take a look at this 'how-to' for a simple jacket, it explains a lot more about the steps you need to take when calculating patterns for your own designs.
11) Finally, shaping is not easy in furry / eyelash yarns, so I've kept it to the very minimum amount, which I think will help, and should be a bit simpler than the pattern in 'Simply Knitting' magazine, which has quite a lot of shaping over the length of the body...
And so to work...
You need:
8 Balls of Wendy Foxy Lady (or 8 balls Sirdar Foxy)
7mm knitting needles for the main part of the knitting (but see note about tension)
6mm knitting needles for the garter stitch edgings (if you have to change the size needed for the main part, you also need to change needle size needed for the garter stitch edging)
Scissors
Safety pins
A blunt needle for sewing up, and some matching sewing thread
Some small plastic bags (odd, I know - but you'll see why in a minute)
A tape measure
Tension:
12.5 stitches and 17 rows to 4 inches (10 cm) square. (Take the time to make a swatch! - On the larger needles, cast on 25 stitches, and work 17 rows in stocking stitch. This should be 8 inches wide and 4 inches long. If it's smaller than that, you need to use bigger needles, and if it's bigger than that, you need to use smaller needles.)
Before you start, divide up the balls of yarn for the back, fronts and edgings. The back should not take more than 3.5 balls, and the two fronts should not take more than 1.75 balls each. Take a ball, and measure / cut off 20 metres, put this into a little bag for the edging and label it appropriately. Take the rest of the ball, and put it put it in a plastic bag labelled ‘Back’ along with 3 more balls. Now take another ball of yarn, and measure out / cut off 10 metres. Add this 10 metre bit to the 'Edgings' bag, then put the remainder of the ball in a bag with one more ball of yarn, and label the bag 'Right Front'. Do exactly the same thing for the Left Front. So now you will have 4 little bags altogether.
Back
(This should make a rectangle measuring 18 inches wide by 20 inches long)
With the larger needles, cast on 56 stitches, using either the long tail method or the cable cast on method. Change to your smaller needles, and knit 8 rows. Change back to the larger needles, and starting with a purl row, work in stocking stitch until the piece is 20 inches long, or you have only about 2 yards of yarn left (whichever comes sooner!). Cast off loosely. Any leftover yarn can go into the edgings bag.
Right Front
(This will mainly be a rectangle 8 inches wide by 20 inches long, with a little bit of shaping for the neckline. Note that this is 1 inch narrower than half the width of the back, to allow for the edging at the centre opening)
With the larger needles, cast on 25 stitches, using the same method as you did for the back. Change to your smaller needles, and knit 8 rows. Change back to the larger needles, and starting with a purl row, work in stocking stitch until the work is shorter than the back by 4 inches, ending with a wrong side (knit) row. Next row cast off 7 stitches, and purl to end. Continuing to work in stocking stitch, decrease one further stitch on the next 2 right side rows, by purling 2 stitches together at the beginning of the row. You will have 16 stitches left. Continue in stocking stitch on these 16 stitches, until the work measures the same length as the back. Cast off. Any leftover yarn can go into the edgings bag.
Left Front
This will be similar to the right front, but you have to reverse the shaping - I've marked the differences in italics
With the larger needles, cast on 25 stitches as before. Change to your smaller needles, and knit 8 rows. Change back to the larger needles, and starting with a purl row, work in stocking stitch until the work is shorter than the back by 4 inches, ending with a right side (purl) row. Next row cast off 7 stitches, and knit to end. Continuing to work in stocking stitch, decrease one further stitch on the next 2 wrong side rows, by knitting 2 stitches together at the beginning of the row. You will have 16 stitches left. Continue in stocking stitch on these 16 stitches, until the work measures the same length as the back. Cast off. Again, any leftover yarn can go into the edgings bag.
Making up (first part)
With right sides of your work together, join the fronts to the back at the shoulder seam only (see the general notes above)
Armhole edgings.
Measure down from the shoulder seam 8 inches on the back and on the front, and mark each of these 2 points. With the right side of the work facing you, and your smaller size needles, pick up stitches for the edging - I think that you should be able to pick up about 50 stitches (see the notes above). Work 4 rows in garter stitch, and cast off loosely. Do the same thing for the other armhole.
Making up (second part)
With right sides together, join the fronts to the back at the side seams.
The front edgings
With right side facing, and your smaller size needles, you need to pick up sufficient stitches for each of the front bands. I think that about 50 stitches ought to do it (but this will depend on how long you made the gilet, see the note about how many stitches to pick up on a vertical edge). Work 6 rows in garter stitch, and cast off loosely. Do the same thing for the other front edge.
The neck edging
With right side facing, and the smaller needles, you need to pick up enough stitches for the neck. I think that you should be able to pick up about 72 stitches altogether. Work 6 rows in garter stitch, and cast off loosely.
Finally, darn in any loose ends neatly, and that's it ... Congratulations! Wear the gilet, and expect lots of compliments, you will deserve them all!! And by the way, I will want a photo to post here, so organise Dad with the digital camera, and send me a photo.
Any leftovers?
Suggestions - a mobile phone / mp3 player cover, a headband / earwarmers, wristbands, edgings on gloves / hats / accessories, card-making / scrap-booking. Use your imagination here, and see what you can come up with...
We all hope that you will enjoy the yarn, lots of love from us all, and hope to catch up with you in the New Year! xxxxx
posted by Mary-Lou @ 12/24/2005 10:45:00 pm
1 comments
![]()
![]()


1 Comments:
Glad you liked it!
M-L xxx
Post a Comment
<< Home